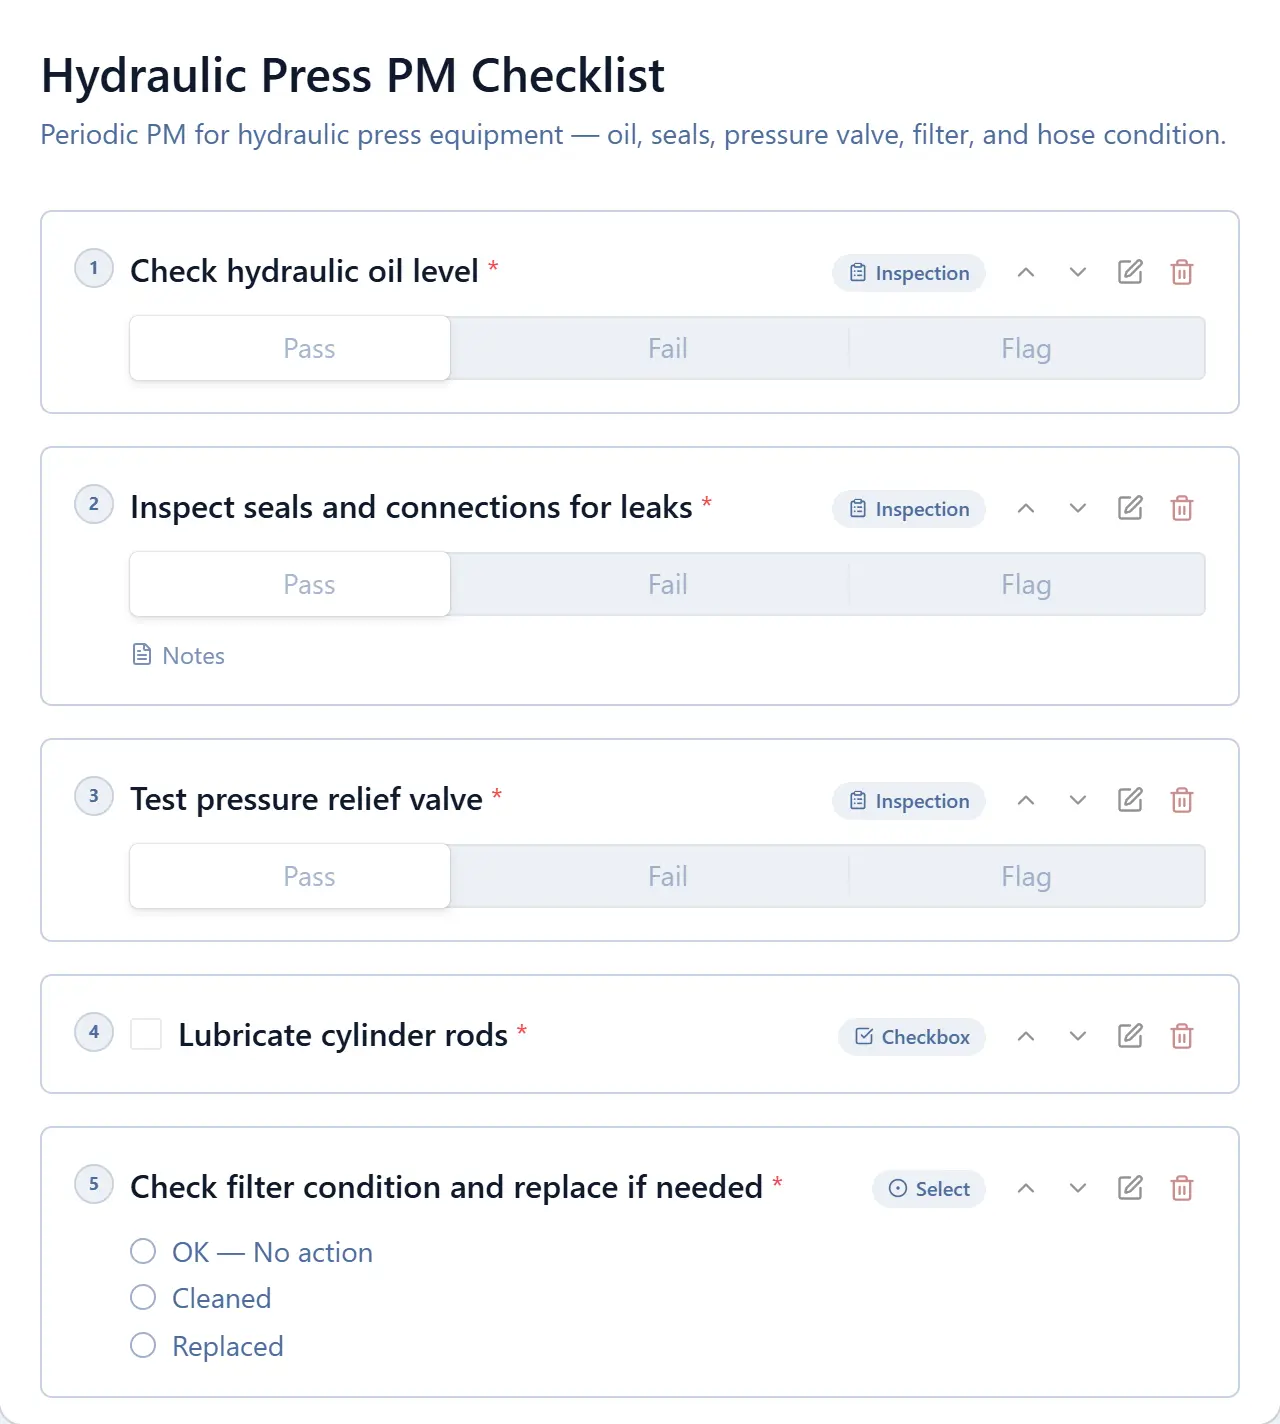




A preventive maintenance checklist is a structured list of inspection, lubrication, cleaning, and testing steps for a specific asset, completed on a scheduled interval to catch developing faults before they cause a breakdown. It is the operational document that turns "we should do PMs" into "these 12 steps, on this machine, every 30 days, by this technician."
Without a checklist, preventive maintenance is just an intention. With one, it becomes a repeatable procedure with a clear result: either the machine passed or it didn't, and someone knows either way.
This article covers what goes into a good PM checklist, worked samples for a hydraulic press and a CNC machining centre, how to build one from scratch, and the single mistake that makes most of them useless. For how preventive fits alongside corrective, predictive, and breakdown work, see our guide to the types of maintenance.
Why PM checklists fail
It's worth starting here, because the internet is full of generic templates and almost none of them warn you about this.
Most PM checklists fail before the machine fails. There are four common ways:
1. Vague steps with no acceptance criteria. A checklist that says "lubricate" is not a checklist. Which point? What grade of grease? How much? A technician who knows the machine will do it correctly. A new technician, or a borrowed one from another line, will tick the box and move on. The checklist is telling you the job was done — but it is not telling you the job was done correctly.
2. Paper checklists nobody reads after completion. The filled sheet goes into a folder. The folder lives in a cabinet. The cabinet gets opened at audit time. In between, there is no way to see that the same step is being flagged as a concern every single month — because the results are invisible. The trend is invisible. The early warning is never acted on.
3. The checklist is written once and never updated. The machine gets modified. A new oil port is added. A guard is redesigned. The belt routing changes. The checklist from 2019 stays the same. Technicians follow a procedure that no longer matches the physical machine, and nobody notices until something goes wrong.
4. Completion pressure kills honesty. "Did you do the checklist?" "Yes." It was ticked before the shift started. There are no timestamps, no mandatory steps, no one to verify. This happens at every plant that relies on paper and has high throughput pressure. It is not a character problem — it is a system problem.
Knowing these four failure modes is useful before you build a checklist, because a checklist that doesn't address them will reproduce the same result.
PM checklists still living in a binder or a shared drive?
See digital PM checklistsWhat to include in a PM checklist
A well-structured PM checklist covers five categories of work. Every asset is different, but these five apply to most production equipment.
Inspection
Inspection items are checks where the technician looks, listens, or measures — and records a finding, not just a tick.
- Oil level and color (not just "checked" — record the color and whether it was topped up)
- Vibration or unusual noise at operating speed
- Condition of seals, hoses, and connections — visual for cracks, weeping, or wear
- Temperature at bearings or critical points, measured with a laser thermometer if warranted
- Condition rating for filters: clean / dirty / replace
- Voltage imbalance between phases — check with a clamp meter at the panel; a persistent 3–5% imbalance accelerates motor winding wear without producing any immediate symptom. The OEM manual won't mention this because it assumes clean input power. It's not the machine's fault — but it is the machine that fails.
- Environmental scan — before you start: is there a seepage under the machine? Is the adjacent machine throwing coolant or chips onto this one? OEM documentation is written for the machine in isolation, not for your specific plant, next to your specific equipment. A 2-minute scan of the surrounding area catches external causes that no OEM checklist will ever cover.
The difference between inspection and just walking past the machine is the record. If the oil was dark amber last month and is near-black this month, that is a signal — but only if both results are written down somewhere comparable.
Lubrication
Lubrication is the most skipped PM step and the most consequential. Specificity matters enormously here.
- Identify each lubrication point by location or number (label them on the machine if you haven't already)
- Specify the lubricant grade and type — "grease" is not enough; "Mobilux EP2 grease" is
- Specify the quantity or the method (two pumps of the grease gun, filled to the sight glass mark)
- Record whether the point was dry, low, or normal before servicing
Cleaning
Cleaning items are often omitted from PMs because they feel like housekeeping rather than maintenance. They are maintenance.
- Filter cleaning or replacement: compressed air blow-down, or water wash, or direct swap — specify which
- Cooling fins and air vents on motors and drives: blocked fins cause thermal shutdowns
- Sensors and encoders: dust on proximity sensors causes false signals; coolant residue on encoders causes position errors
- Chip and swarf removal from linear guides and ballscrews on CNC machines
Adjustment and tightening
Machines vibrate. Fasteners loosen. Belts stretch. These items need periodic check and correction.
- Belt tension: check against specified deflection or tension gauge reading, not by feel
- Alignment of couplings or drive shafts after any maintenance or thermal cycling
- Torque check on critical fasteners (documented torque value in the checklist, verified with a calibrated torque wrench)
- Adjustment of limit switches or proximity sensors that have drifted out of position
Testing
Testing items verify that the machine performs as expected after the PM — and critically, that safety systems are functioning.
- Emergency stop function: activate, confirm the machine stops in the specified time or distance, reset and confirm it requires deliberate action to restart
- Guard interlock switches: open a guard, confirm the machine cannot start or stops immediately
- Pressure relief valves on hydraulic systems: set point verification (consult OEM for method)
- Electrical continuity or insulation checks on high-voltage circuits where scheduled
Every completed test should record a pass or fail result, not just "done."
Sample PM checklist — hydraulic press
This is a generic starting-point template for a hydraulic press. It is not a substitute for your OEM manual or for a review by someone who knows your specific machine. Use it to understand the structure, then adapt it.
| # | Item | Category | Interval | Acceptance criteria | Result |
|---|---|---|---|---|---|
| 1 | Hydraulic fluid level | Inspection | Monthly | Between MIN and MAX on sight glass | Pass / Fail |
| 2 | Hydraulic fluid color and clarity | Inspection | Monthly | Amber, clear — not dark or milky | Pass / Fail |
| 3 | All hose connections and fittings | Inspection | Monthly | No visible weeping or seepage | Pass / Fail |
| 4 | Ram seal condition | Inspection | Monthly | No external leakage on ram surface | Pass / Fail |
| 5 | Pump and motor for abnormal noise | Inspection | Monthly | Smooth operation, no grinding or knocking | Pass / Fail |
| 6 | Motor bearing temperature | Inspection | Monthly | Below 70°C at bearing housing | Pass / Fail (record reading) |
| 7 | Hydraulic filter element | Cleaning / Replace | Monthly | Replace if indicator red; blow out strainer | Pass / Fail |
| 8 | Cylinder rod lubrication point | Lubrication | Monthly | Apply specified grease (record grade used) | Done / Not done |
| 9 | Slide and guide lubrication | Lubrication | Monthly | Apply to all guide points per lube chart | Done / Not done |
| 10 | Pressure relief valve set point | Testing | Quarterly | Matches specification on data plate ± 5 bar | Pass / Fail (record reading) |
| 11 | Emergency stop function | Testing | Monthly | Press stops all motion within 2 seconds; reset requires key | Pass / Fail |
| 12 | Guard interlock function | Testing | Monthly | Machine cannot start with guard open | Pass / Fail |
Checklist version: 1.0 | Asset: Hydraulic Press (generic) | Completed by: ________ | Date / Time: ________
Any item that is "Fail" or borderline must have a note and generate a follow-up work order. Your press may have additional lubrication points, accumulator maintenance requirements, or die-change procedures. Add them. Remove anything that does not apply. Then version the result.
Sample PM checklist — CNC machining centre
A second example, because a machining centre has a different failure profile to a hydraulic press: cutting fluid contamination, chip and swarf ingestion into linear guides, and thermal drift from inadequate warmup.
| # | Item | Category | Interval | Acceptance criteria | Result |
|---|---|---|---|---|---|
| 1 | Spindle bearing noise at operating speed | Inspection | Daily | No grinding or high-pitched squeal | Pass / Fail |
| 2 | Coolant level and concentration | Inspection | Daily | Level within range; concentration per spec (check with refractometer) | Pass / Fail (record reading) |
| 3 | Coolant color and odor | Inspection | Weekly | Clear to milky; no sour odor (bacterial contamination) | Pass / Fail |
| 4 | Chip conveyor and chip tray | Cleaning | Daily | Clear of chip buildup; conveyor running freely | Done |
| 5 | Linear guide and ballscrew wipers | Cleaning | Weekly | No swarf or coolant residue on guide surfaces | Done |
| 6 | Spindle nose and tool taper condition | Inspection | Weekly | Clean, no corrosion, tool seats fully | Pass / Fail |
| 7 | Lube unit oil level (way oil) | Inspection | Weekly | Between MIN and MAX; auto-lube cycle confirmed | Pass / Fail |
| 8 | Voltage imbalance between input phases | Inspection | Monthly | ≤ 2% imbalance at panel; record all three phase readings | Pass / Fail (record) |
| 9 | Air pressure to pneumatic drawbar | Inspection | Monthly | Within OEM spec (typically 6–8 bar); check regulator and filter bowl | Pass / Fail |
| 10 | Warmup cycle before first operation | Testing | Daily | Machine runs standard warmup program before any precision work | Done |
Checklist version: 1.0 | Asset: CNC Machining Centre (generic) | Completed by: ________ | Date / Time: ________
Both sample checklists above can be copied directly into Excel or used as a starting point for your own template. The column structure — item, category, interval, acceptance criteria, result — is what makes results comparable over time.
How to build a PM checklist for your plant
Step 1: Start with the OEM manual. Most plants have it somewhere. Many have never opened it beyond the installation section. The OEM's maintenance schedule is the baseline — it covers the lubrication intervals, the recommended consumables, the inspection points, and the warning signs specific to that machine design. Start there.
Step 2: Add site-specific conditions. An OEM manual is written for a generic installation. Your plant has specific conditions: higher ambient temperatures, dusty or humid environments, longer-than-rated shift patterns, fluids or materials that the OEM didn't anticipate. Pull your work-order history for the machine — what has actually failed, how often, and when. The failure modes that show up repeatedly are the ones your checklist must address explicitly.
Step 3: Version it. The checklist is a controlled document. When the procedure changes — because the machine is modified, because a failure points to a step you missed, because the OEM issues revised guidance — the checklist version changes too. Version 1.1 is different from version 1.0, and every completed PM should record which version was followed. That way, if there is a failure six months from now, you can look back and see exactly what procedure the technician followed on the last three service dates. Without versioning, you have no way to know.
Step 4: Test it with a technician. Write the draft, then hand it to a technician and ask them to follow it cold, without explanation, on the actual machine. Watch. Anything that causes a pause, a question, or a workaround is ambiguous and needs rewriting. "Check belt tension" — but which belt? Where is the specification? Without those answers in the checklist, the result depends entirely on who is doing it.
Step 5: Link it to the work order. The checklist should be part of the job, not a separate document in a separate location. When a PM work order is dispatched, the relevant checklist goes with it — whether on paper attached to the job card, or opened automatically on the technician's phone. The completion record should stay with the work order in your maintenance history, not in a folder on a shelf.
The pattern I've seen most often on-site isn't a missing checklist — it's a checklist that nobody trusts. The technician knows the machine. He runs through it from memory, spending time on the points that have caused trouble before and moving quickly past everything else. The checklist sheet gets signed; the checklist procedure doesn't get followed.
The deeper problem is that PM checklists grow and never shrink. Every incident adds a new line. A checklist that started at 12 items becomes 28 over three years. Somewhere in those 28 items are four that are clearly pointless — a component that was redesigned and no longer exists on the machine, a guard latch that was welded shut after a modification, a check that has never found anything in eight years. The technician notices. One obviously useless step makes the entire checklist feel like bureaucracy. The nonchalance spreads from the useless steps to the critical ones.
A PM checklist needs to be audited for removal as well as addition. If a step has never found anything in two years, ask whether the failure mode it guards against is real on this machine, in this environment. If the answer is no, cut it. A checklist with 10 steps that every technician follows correctly outperforms a checklist with 30 steps that everyone has quietly stopped trusting.
How many steps is right?
The honest answer is 8 to 15 steps for most machine PMs.
Fewer than 8 and you are probably missing critical items. A checklist with 5 steps for a CNC machining centre is not a thorough PM — it is a spot-check.
More than 20 and the checklist becomes a burden. Technicians rush through it, skip steps under time pressure, or start ticking boxes without doing the work. A checklist that nobody follows honestly is worse than a short one that is followed every time, because it gives a false assurance that the work was done.
If a genuine PM on a complex machine needs 30 steps, the right answer is to split it: 15 steps monthly, 15 steps quarterly. The quarterly checklist includes everything on the monthly one plus the deeper items. The technician knows exactly what they are doing and why.
A good PM checklist should feel like a focused procedure, not a comprehensive catalogue. The goal is to catch the things that typically go wrong, in a form that is consistently executable.
Digital vs paper checklists
Both can work. Neither is inherently better. The difference is in what you can see and verify.
Paper checklists are flexible, require no setup or training, and work anywhere. The limitation is that paper is passive — it records whatever the technician writes, with no way to verify timing, sequence, or whether mandatory steps were completed. A stack of paper PMs tells you nothing about trends unless someone manually reviews every sheet.
Digital checklists change the verification model. Each step is timestamped when the technician completes it. Mandatory steps can block the work order from closing — if the emergency stop test is marked mandatory, the job cannot be signed off without completing it. Abnormalities found during the checklist can generate a follow-up work order in one action, linked to the asset and the specific step that flagged it. The result is searchable, comparable over time, and attached to the asset's history.
The question of which to start with is a practical one. If your PM program is new or in early stages, start on paper. Focus on getting the right content into the checklist, testing it with your technicians, and building the discipline of doing PMs consistently. Once the program is established — once you know the right steps and the right intervals — move to digital, because that is when the data becomes valuable and the verification matters.
The mistake is going digital too early with underdeveloped checklists. A poorly-written checklist on a mobile app is still a poorly-written checklist. Sort the content first.
A consistent PM checklist is also the most direct way to reduce breakdown maintenance on your critical equipment — the two are directly connected.
Where MachDatum fits: checklists in MachDatum are versioned — every step has instruction text and attachments (a photo of the lubrication point, a torque diagram, the OEM spec). Mandatory steps block work order closure if unchecked. Each completed step is timestamped. The checklist result is attached to the asset's history, not a folder on a shelf. Abnormalities found during a PM become linked work orders in one tap.
We're onboarding our first group of manufacturing teams right now — see how it works.